
First bucket list item in the books! But, I’m by no means ready to give it up as a one and done! Dozens of YouTube videos and Pinterest articles down, and I’ve been able to successfully make my own knives from old saw blades and from files. I’ve always found the process of learning to make things with my hands extremely satisfying, but something about making these knives was extra special, particularly the file blades. These little numbers provide just the right amount of heft in your hand and feel like a tool that could last a lifetime. My mind is already swirling with different blade shapes and sizes, but my ultimate goal is to make a functional kitchen knife. Now, enough of the rambling. Let me walk you through the process.
Circular Saw Blade:
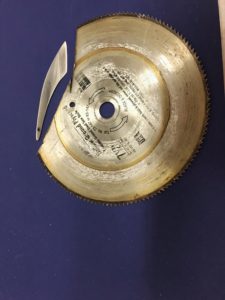
- I started with an old and worn out saw blade that I’ve have had kicking around for years
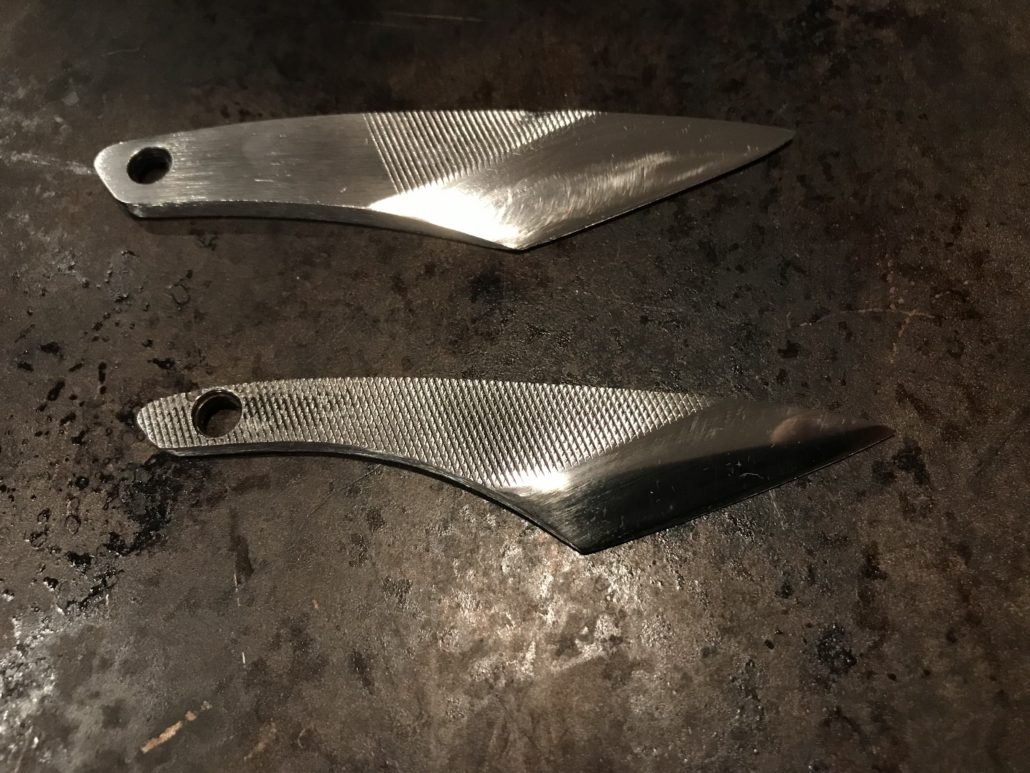
- I decided to start my bladesmithing journey recreating a Japanese Kiridashi style blade. I chose this one because I like the simplicity and the single side bevel while still being extremely versatile and functional.
- After creating a sketch, I was able to cut out a paper template that I used to transfer the pattern onto the saw blade
- From there it was time to break out the power tools! Using an angle grinder I let the sparks fly. Quick tip, however, don’t do this inside the house! First, of all angle grinders eating metal are loud – REALLY LOUD. Second, you probably (as I did) will set off every smoke alarm in the house. And, since the grinder is so loud, you won’t hear the alarm. Take it from me, this makes for an upset wife and two freaked out dogs!
- Once the basic shape is cut the hard work begins. If you are lucky enough to have a belt sander you can get your shape dialed in pretty quickly, otherwise, you’ll need to do some hand filing. A bench vise comes in handy at this stage so that the blade can be held steady
- Finally, it’s time to start your edge. Being no expert, I randomly chose an edge angle to start with. The traditional kiridashi style makes this an easier step since only one side of the blade will be angled. The side of the angle depends on if you happen to be right or left handed. Right-handed people will use a blade with a bevel on the right and left-handed people will use a blade with the bevel on the left. With that being the case I used a sharpie to sketch a line about 3/8 inches in from what will become the sharp edge of the blade.
- I used a C clamp to secure the blade to my workbench and I carefully filed the edge being sure to consistently maintain the angle I wanted to achieve.
- Once I had almost achieved a semi-sharp edge I switched over to a wet sand method using 600 grit wet dry automotive sanding paper. Again, carefully maintaining my angle.
- Next, I progressed to a 1500 grit sandpaper using water again.
- At this point, the blade is becoming sharp
- using the same 600 and 1500 grit papers, I lay the blade flat on the paper and polish the flat sides
- I finished the sharpening process using a kitchen knife sharpener I had in the drawer – though I honestly feel like it is cheating. I really need to learn more about hand sharpening with stones, to be honest.
Overall this is a sharp little blade. It would make a perfect kneck knife but I think I will use it in my shop as a leather cutting tool or scribe as the traditional knives were used.
File Blade:
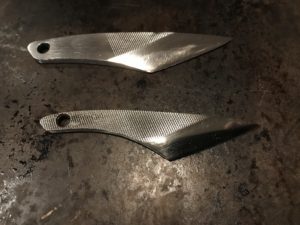
This is where the fun begins! The high carbon content and thickness of a file make the perfect starting point for a knife blade. That coupled with the texture of the file itself also makes for an exceptional grip and style.
- Since I was familiar with the shape and style I stuck with the kiridashi blade for this one.
- Due to the extremely hard nature of a file, the blade must be annealed in order to become soft enough to shape. This requires heating the blade red hot and allowing it to cool. I did this using a canister of MAP gas that I have in my shop
- Once cool, I sketch my desired pattern onto the blade, secure it firmly in a bench vise, and get to work with the bench grinder. This time I did the grinding in the garage. However, since I had the garage door closed, I still managed to set off the alarm and frustrate the entire house!
- TIP – It’s important to note here that you will find the file much more difficult to cut that you did the saw blade. If you are just jumping into trying this, do yourself a favor and sacrifice an old saw blade first
- From this point, the shaping and edge creation steps are the same. That is until you finish with the sharpening
- Now it’s time to reharden the blade! Fun Stuff
- Using the same torch you used in the annealing process, head the blade edge until red hot
- Once heated immediately quench the blade in a can of vegetable oil. Don’t use old motor oil as you may have seen elsewhere! you will find out why in the next step
- Wipe any excess oil from the blade and place it in your oven that has been preheated to 350 degrees. Set the timer for 1 hour. Now, if you had used old motor oil, your house is going to stink like hell! Once again, I have just saved you from an upset wife. You owe me!
- After 1 hour remove the knife from the oven and allow it to cool naturally
- You’ll notice that your blade has been blackened from the heat. Using the 600 and 1500 grit papers with some water you will quickly be able to remove the blackening and restore some polish to the blade
- I finished mine off with some metal polish to bring out the shine
Overall making these knives is amazing. I’ve even been teaching my oldest to make ones of his own. Combined with a simple kydex sheath they make perfect kneck knives. If you’ve ever thought of trying to make a blade for yourself this is an excellent way of doing it with only simple common tooling. Please feel free to reach out to me directly if you have any questions and please share your creations with us! Enjoy!